
What is inducement in trading?
Inducement is a smaller, obvious high or low that lures traders to enter early and place stops, creating liquidity for price to grab before moving to the true zone, often sitting…

Inducement is a smaller, obvious high or low that lures traders to enter early and place stops, creating liquidity for price to grab before moving to the true zone, often sitting directly in front of the genuine order block or supply/demand zone, making patience key to waiting for this level to be swept rather than entering at it.
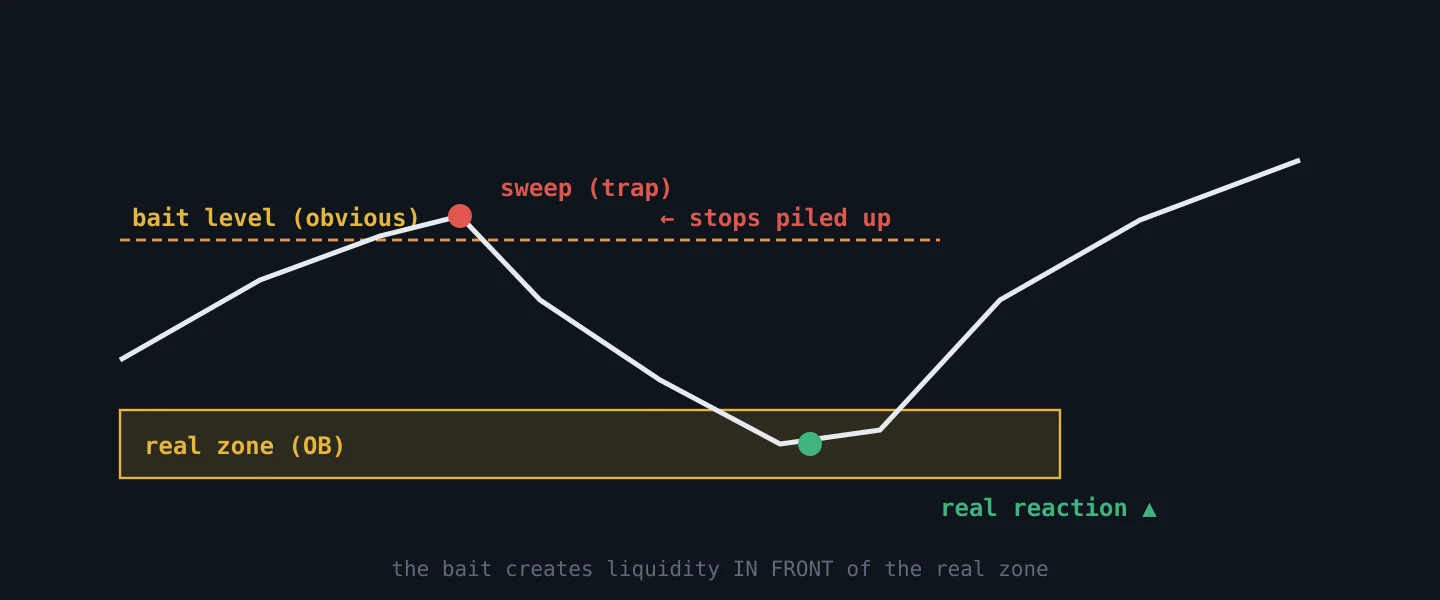
What is inducement, and how does it appear on a chart?
Inducement is a seemingly attractive level that tempts traders into making an early entry. This obvious high or low often looks like a clear entry point, a fake breakout, or a minor swing point on the chart. Crucially, it usually sits IN FRONT OF (before) the genuine order block (OB) or supply/demand zone that price truly intends to react from.
For example, after a strong move, price might create a small high, suggesting a reversal. This is the inducement, a temporary lure before the real price action unfolds.
Why does inducement matter to traders?
From an SMC perspective — inducement is a staple of ICT teaching — it is crucial because it represents easily accessible liquidity. "Smart money" or institutional players understand that retail traders will see these obvious highs or lows and place their stop-loss orders just above or below them. These resting stops create a pool of liquidity that price often needs to "grab" before moving in its intended direction towards a true OB or a more significant structural point like a BOS or CHoCH. Understanding this context, combined with broader market insights from tools like ForexCommand's MRS or CTS, can help refine your market read.
How do you spot inducement on a chart?
Spotting inducement is a repeatable process once you know what to look for. Work through it in order:
1. Mark the higher-timeframe zone first. Identify the genuine order block, fair value gap, or supply/demand zone price is heading toward. Inducement only makes sense relative to that true target.
2. Find the obvious level in front of it. Look for the nearest minor swing high or low sitting between current price and that zone — the one a retail trader would treat as an entry or place a stop behind.
3. Confirm resting liquidity. That obvious level should show clean equal highs or lows where stops pile up. That pool of liquidity is exactly what price is drawn to.
4. Wait for the sweep, not the touch. Real inducement is confirmed only when price grabs that level and rejects, ideally leaving a BOS or CHoCH as it turns toward the true zone.
If a level gets swept and price simply keeps going with no reaction, it was never inducement — just structure breaking.
Inducement vs. a liquidity grab: what is the difference?
The two are closely related, which is why traders confuse them, but they are not the same thing. A liquidity grab is the event — the moment price spikes through an obvious high or low to trigger resting stops. Inducement is the level itself — the deliberately tempting high or low that exists to create those stops in the first place.
Put simply: inducement is the bait, the liquidity grab is the bite. Every inducement is designed to end in a liquidity grab, but not every liquidity grab happens at an inducement — price also sweeps liquidity at major structural highs and lows that were never "bait." Reading the two together tells you why price reached for a level, not just that it did.
How can traders use the concept of inducement?
Trading around inducement is about patience — waiting for the obvious level to be swept rather than entering at it. If price is trending up, it might first dip below a minor low (inducement) to take out early buyers' stops before moving up to a higher, unmitigated supply zone.
Conversely, in a downtrend, price might rise above a minor high (inducement), luring early sellers. After sweeping these stops, price then falls sharply to the actual demand zone. The key is recognizing the inducement and waiting for its "failure" before considering an entry aligned with the true zone.
Inducement example: a step-by-step walkthrough
Picture EUR/USD in a clear uptrend, approaching an unmitigated demand zone below current price:
1. Price pulls back and forms a small, obvious swing low well above the demand zone. Early buyers enter there, and their protective stops rest just beneath it.
2. Price dips, sweeps that minor low, and triggers those stops — the inducement is taken and the early longs are stopped out.
3. Instead of collapsing, only now does price reach the true demand zone, react, and resume the uptrend.
The patient trader ignored the obvious low, waited for it to be swept, and entered from the real zone — while the early crowd funded the move. That sequence — obvious level, sweep, reaction from the true zone — is the signature of inducement in action.
What common mistake do beginners make with inducement?
The most common mistake beginners make is entering the market at the inducement level itself. Believing it to be the true turning point or a valid breakout, they place their stops just beyond it. When price then sweeps this inducement to collect liquidity, these early entries are stopped out, only for price to reverse shortly after and move in the direction they originally anticipated, but from the true OB or zone.
Is inducement real, or is it hindsight?
This deserves a straight answer, because the concept is unusually easy to see everywhere once you have the word for it.
What holds up: stop orders genuinely do cluster just beyond obvious swing points, and price genuinely does trade through those clusters and reverse. Neither claim needs a theory of institutional behaviour — both follow from where ordinary traders place stops, and both are visible on any chart.
What does not hold up as stated: that a specific participant placed that obvious high there on purpose, as bait. No retail platform can show intent, and the same candle pattern forms constantly for entirely mechanical reasons. "Inducement" describes a shape; the story about who built it and why is an interpretation laid on top.
The honest failure mode is hindsight. After a reversal, the level price swept is obvious and gets labelled inducement; the identical level that price swept and kept going gets forgotten, because it did not fit. If you only count the ones that worked, any concept looks infallible.
The way to use it without fooling yourself is to make it a rule rather than a narrative: mark the obvious level before price reaches it, decide in advance what a sweep-and-reject looks like, and accept the trades where it simply breaks. Marked in advance, inducement is a plan. Named afterwards, it is a story.
The takeaway
Inducement is the obvious level sitting in front of the one that matters — the high or low that looks like the entry, collects the stops, and gets swept on the way to the real zone. Mark the genuine zone first and the bait second, wait for the sweep instead of the touch, and treat a level that breaks without reacting as what it is: ordinary structure, not a failed trap. The patience it forces is worth more than the theory behind it.