
What is an order block?
An order block (OB) is the last opposing candle or candle cluster before an impulsive price move that breaks market structure, marking a specific zone where institutions likely…

An order block (OB) is the last opposing candle or candle cluster before an impulsive price move that breaks market structure, and, within SMC, it is read as a zone where institutions may have placed significant orders — an interpretation the chart itself cannot confirm. Traders watch for price to return there expecting a reaction.
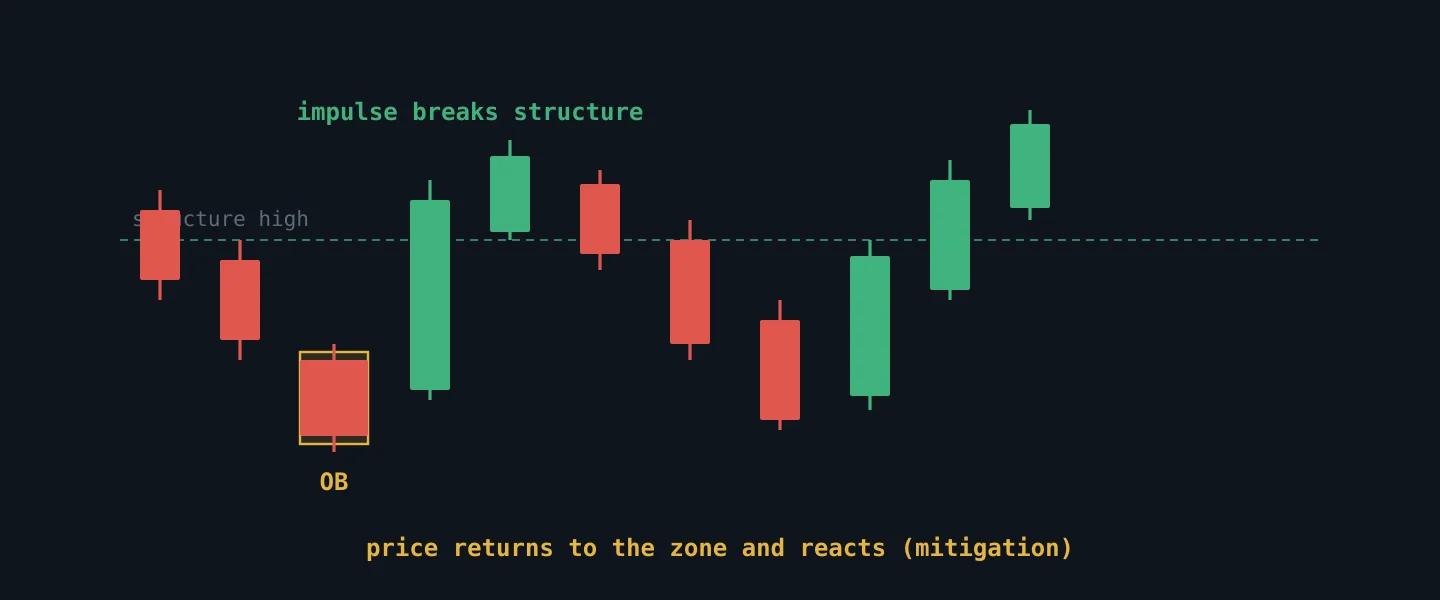
What does an order block look like on a chart?
An order block is typically the last down-candle before a strong up-move (bullish OB) or the last up-candle before a strong down-move (bearish OB). This candle — or a cluster of small candles — represents a point where "smart money" may have accumulated positions before pushing price aggressively in one direction.
The key characteristic is that the move that follows should be impulsive, signalling significant participation. Marked precisely, the zone runs from the open to the close of that opposing candle in the conservative reading, or from its high to its low in the wider one. Traders differ on which; what matters is picking one and staying consistent, because the two produce different entries and different stops.
The ForexCommand desktop app can draw Order Block and Fair Value Gap overlays on its TPO / Market Profile chart, helping traders visualise these zones on live price.
How do you identify a valid order block?
Most candles that look like order blocks are not. Four filters separate the real ones:
- It must have caused a break of structure. If the impulse from that candle did not close beyond a prior swing point, nothing structural happened and the candle is just a candle. This is the single most important filter.
- The move away must be impulsive. A slow drift out of the zone suggests ordinary two-way trading, not a large participant pushing.
- It should be unmitigated. Price should not have already returned and traded through it — see below.
- It should sit on a timeframe that matters. An order block on the 1-minute chart inside a 4-hour range will be swallowed by the larger move.
Applied honestly, these filters usually leave two or three zones on a chart, not fifteen.
What does "mitigated" mean?
This is the piece of vocabulary the concept assumes you already know, and most explanations skip.
An order block is unmitigated while price has not yet returned to it. The idea is that the institutional orders supposedly left there are still unfilled, so the zone still has something to offer. Once price trades back into it, the block is mitigated — those orders are considered filled, and the zone is treated as spent.
The practical rule most traders follow: an unmitigated block is a zone of interest, a mitigated one is history. A block that price has already visited twice is not "stronger for holding twice"; under the framework's own logic there should be nothing left in it.
Why do order blocks matter in the SMC framework?
Order blocks are central to the Smart Money Concept (SMC) because they are believed to reveal the footprints of institutional traders. The theory suggests that large institutions cannot fill all their orders at once without moving the market significantly, so they leave unfilled orders in specific price zones.
Traders watch for price to return to that zone, expecting these unfilled orders to react there, potentially leading to a reversal or continuation. It is worth being clear that the story is unverifiable from a retail chart — you can see the candle and the reaction, never the ledger. What survives without the story is simpler and still useful: a zone that produced a structural break once is a zone where a decision was made, and decisions tend to be defended.
Combining it with market context from tools like ForexCommand's MRS (Market Readiness Score) or CTS (Carry Trade Score) can offer additional perspective.
How does a trader use an order block in practice?
Walked through with numbers on EUR/USD.
Price has been climbing and prints a swing low at 1.0840. It then rallies to 1.0920, stalls, and one final bullish candle closes at 1.0915 — after which a large bearish candle drives price down through 1.0840 and closes at 1.0805. That close beneath the prior swing low breaks structure against the trend — a change of character (CHoCH) — so the bias flips bearish.
The bearish order block is that last bullish candle before the drop: the zone from its open at 1.0898 to its close at 1.0915. It is unmitigated, because price has not been back since.
The trade is the retrace. You wait for price to rally into 1.0898–1.0915 and show rejection — ideally a candlestick reversal on entry into the zone. Entry around 1.0905, stop above the block at 1.0925, because a close above it means the sellers who created the impulse are no longer defending. That is 20 pips of risk against the obvious downside liquidity beneath the range lows.
Note the sequence: structure first, zone second, confirmation third. Reverse that order and the block is a rectangle you drew because you wanted a trade.
What is a common mistake when identifying order blocks?
Marking every last opposing candle. A valid order block is the one that caused a break of structure. Without a confirmed BOS or CHoCH originating from that candle, it is a regular candle.
Reusing a mitigated block. Once price has traded through it, the framework's own reasoning says the orders are filled. Traders who keep going back to the same zone are trading a drawing, not an idea.
Entering on touch instead of reaction. Arriving at the zone proves nothing. The rejection is the evidence.
Ignoring the higher timeframe. A beautiful bullish block on the 5-minute chart means very little if the 4-hour just broke down. Structure on the higher timeframe outranks the zone on the lower one.
The takeaway
An order block is the last opposing candle before the move that broke structure — the place a decisive push began. Mark it only when a break of structure confirms it, treat it as spent once price has mitigated it, and use it to time an entry in a direction structure has already given you. The institutional story behind it cannot be verified; the discipline it imposes — no zone without a structural break — is what makes it worth using anyway.